All the Nexus line received update to Android 5.1 and the Nexus 4 comes last finally counting fix for the Lollipop failures bars. His build LMY47O is not the most current, but has many improvements over the LRX22C. Apparently, only some users are getting the new version over the air, but those who want to experience the novelty can install the file via ADB.
It is important to follow the following procedure only you have knowledge about fastboot EADB. To have Android 5.1 on your Nexus 4, just move the .zip file from the OTA update via recovery. However, for anyone with root access released or have modified the system, you must reinstall the Lollipop on your device before applying the update. To do this, download the necessary files and follow the step by step to install manually on your device
Files Needed:.
Follow the steps below:
- Download the SDK and extract the file in the root of the C: drive on your PC
- Download and install the Windows drivers
- Turn off your Nexus
- Call the holding the Volume + button Less Power button to enter the fastboot
- Connect your device to your PC to install the drivers
- Go to the SDK unzipped folder on your PC
- Press Shift + right-click
- Select Open Command Window Here
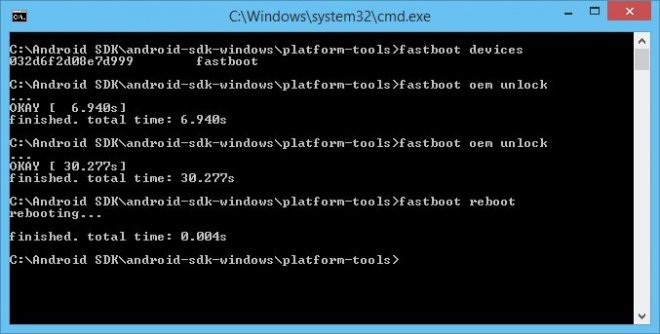
and enter the following commands:
- devices Fastboot
- Fastboot oem unlock
Select Yes in the window that appears on your smartphone with the Power button.
After the procedure finished type fastboot reboot and your phone will reboot. The process can take 2-3 minutes to complete.

Installation via FLASH
The process here is a little different from the previous. You will have to extract twice the downloaded image until you reach a file in tar format. It is recommended to use 7zip program for this
After unpacking the image, follow the steps below:.
- Turn off your Nexus
- Enter Fastboot mode (Volume Less + Power button)
- Connect your Nexus to your PC
- Click the file-all.bat flash file
- Wait until the procedure is finished
- Your phone will restart in about three minutes
If you do not restart automatically, select the Recovery option when the green robot appears, press button Power + Volume More and select “Wipe data / Factory data reset.”
Your Nexus will restart with Android 5.0.1 Lollipop LRX22C. To get the new version LMY47O follow these steps.
Urging OTA update manually
Initially you will have to release the clearance USB on your Nexus 4:
- Go to system settings and choose About Phone
- Tap the version number seven times
- Return to the previous screen and access Developer Options
- Scroll down to Debugging USB and turn on the feature
- Make sure that the option is unlocked Bootloader
- Connect the Nexus on your PC and accepted the dialog box that appears
Now comes the second part, pass the installation .zip file to your smartphone:
- Put the ROM update file in the same folder as the ADB Fastboot on your PC
- Type the following command:
- Get in bootloader mode (connect the Nexus holding power button and volume less)
- Get in recovery mode (use the volume button to navigate and the power to confirm)
- recovery Within select the Apply Update option from ADB and confirm with power button and give the following command
- adb sideload [filename] .zip
After process finished, simply restart your Nexus 4 and enjoy the new version of Android 5.1 Lollipop.
No comments:
Post a Comment